Well, I’d like to talk about a secret obsession I have. A sickness, really.
I am Amanda and I am a virtual cart ditcher.
It all starts innocently enough. Looking for a few moments to rest my brain while writing, I wander over to one of my favorite websites to do a little online window shopping. And then I see it. The perfect dress, waiting for me out there in Internetland. With just one click, it’s in my cart. But I can’t possibly justify the cost of shipping for just one, itty bitty dress. Hmmm…what else is on sale? Love those earrings! Click! Ooooh! I’ve always wanted shoes like that!
Click, click, click!
And once my shopping cart is full of glorious treasures, all for what I am sure my husband should understand is a real steal, it happens. I get the worse case of shopping cart anxiety you can imagine and I ditch that baby. I return to my regular tasks, all the while trying to ignore the pleas of the little, yellow dress waiting for me in my abandoned virtual cart.
“Amanda, come back! You could wear me to the Derby!”
Ugh.
I shutter to think about it, sunshine yellow, alone.
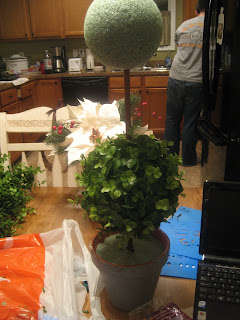
My husband doesn’t think this is a problem, I’m sure. In fact, I’m pretty confident that he is thankful (and possibly the source) for my online shopping anxiety. And though I have missed some pretty incredible sales (like the beautiful $30 necklace I SHOULD have bought at Anthropologie yesterday) I have also saved a ton of money by ditching my cart and finding creative ways to make my own version of the things I love online. And that is exactly how the idea for creating this topiary came about. I’ve filled my virtual cart at Ballard Designs with those oh-so-gorgeous boxwood topiaries one too many times only to leave them, begging for a home on my mantel, alone. So if you’re like me and you have Ballard taste on a Big Lots budget, here’s a step-by-step guide to creating your own topiary for about $15.
 Photo from Ballard Designs
You’ll Need:
One 5 inch Styrofoam ball (green)
One 6 inch Styrofoam ball (green)
1 dowel rod (approx. 1/2 inch)
Floral foam for pot
Brown paint
Sponge brush
Glue gun and glue
Moss
5 branches of artficial greenery
Container of your choice (I painted a regular clay pot)
Lamp finial
Girly Movie
1. To create the container for the topiary, I started with a coat of nutmeg brown paint. Once that dried, I painted a layer of crackle paint (which gives you a neat distressed look) over the brown and let that dry. Be sure you only paint one layer of the crackle medium otherwise you won’t get the effect you want. Once the crackle medium was dry, I painted the pot a soft blue-grey color and added a fleur-de-lis.


2. Using a Dremel tool, I cut the dowel rod to the length I wanted then painted it brown.
3. Once the paint was dry, I covered the bottom of the dowel rod with hot glue then stuck it into the foam in the pot. This makes everything a little more sturdy.
4. Mark where you want the topiary balls to go with hot glue on the dowel rod them push them down on the stick. With the holes already in place, you won’t risk covering too much of the balls.
5. Now comes the time for covering the Styrofoam balls. To get the most out of my branches, I removed all of the little twigs from the branch and cut them up into smaller groupings. This is where the girly movie comes in handy because you’ll be sitting with that glue gun for about an hour, maybe more. I found that blanketing the ball with the smaller grouping of greenery worked best. Once I had filled all of the space, I went back and added longer twigs for a dramatic effect. Do this with both Styrofoam balls.
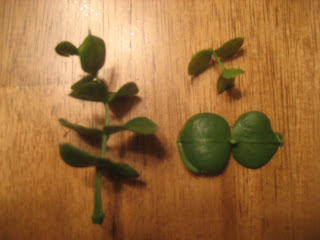
To the left is what I had when I removed the twig from the branch. I cut the bottom 3 groupings of two-leaves off to cover the ball. Once the ball was blanketed with those, I added the top sprigs for a little more texture.